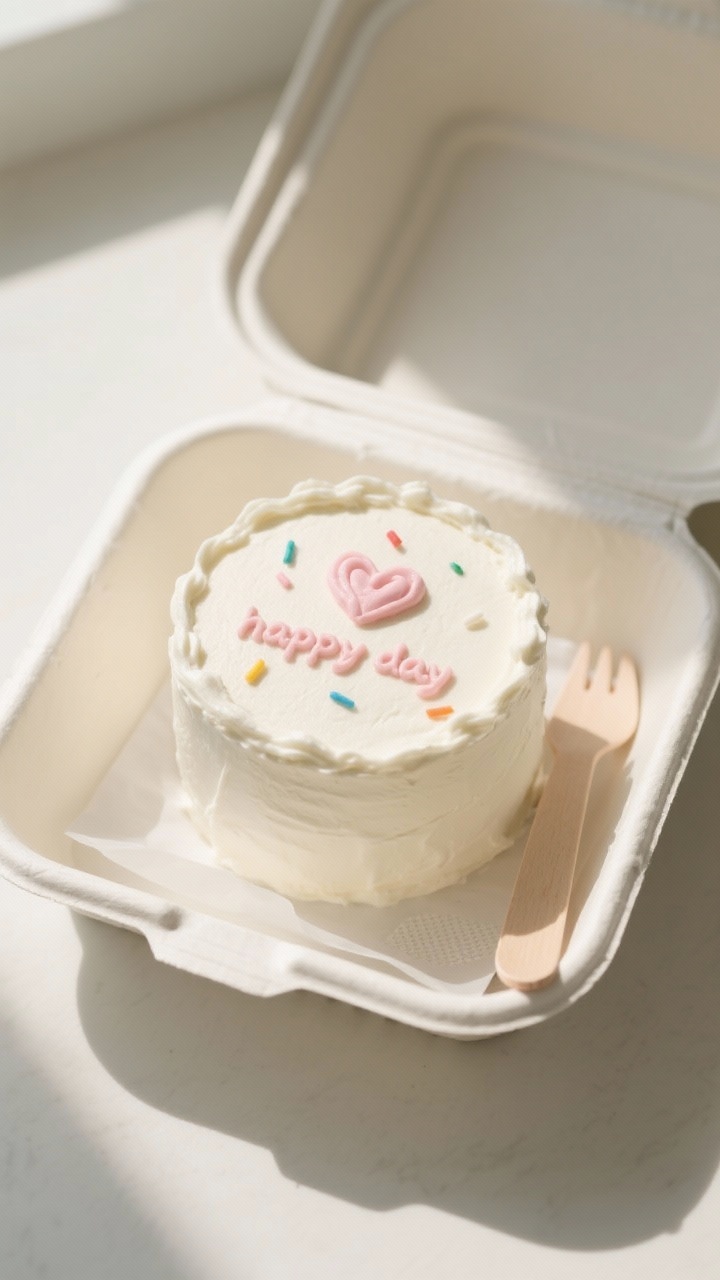
Bento cakes are the tiny trend that actually lives up to the hype. They’re small, adorable, and perfect for sharing with one or two people. Think of them as mini celebration cakes tucked into a takeout-style box—easy to transport, easy to gift, and fun to decorate.
This recipe keeps things simple: soft vanilla sponge, light whipped buttercream, and clean, polished edges. If you’ve ever wanted to try cake decorating without committing to a full-size cake, this is the sweet spot.
Why This Recipe Works
This recipe uses a small sponge baked in a quarter sheet pan, then punched out into neat, uniform layers—no special cake tins required. The cake is a soft vanilla buttermilk sponge, which stays moist even after chilling.
The buttercream is a whipped Swiss-style buttercream that’s smooth, not too sweet, and perfect for delicate piping. The portion size (about 4 inches wide) makes it easy to decorate without stress. Plus, the method is beginner-friendly while still delivering a professional look.
Shopping List
- For the Cake:
- All-purpose flour (1 1/2 cups)
- Granulated sugar (3/4 cup)
- Baking powder (1 1/2 teaspoons)
- Salt (1/4 teaspoon)
- Unsalted butter, melted (1/2 cup)
- Eggs (2 large)
- Buttermilk (1/2 cup)
- Vanilla extract (2 teaspoons)
- Neutral oil (1 tablespoon) for added moisture
- For the Buttercream:
- Egg whites (3 large) or pasteurized carton egg whites (90 g)
- Granulated sugar (3/4 cup)
- Unsalted butter, room temperature (3/4 cup)
- Vanilla extract (1 teaspoon)
- Pinch of salt
- For Assembly and Decoration:
- Strawberry jam or lemon curd (optional filling)
- Food coloring gel (optional)
- Sprinkles or decorative candies (optional)
- Parchment paper
- 4-inch round cutter (or trace and cut with a knife)
- Small offset spatula and piping bag/tips
- Bento box or small takeout-style box
Step-by-Step Instructions
- Preheat and Prep: Heat the oven to 350°F (175°C).
Line a quarter sheet pan (9×13 inches) with parchment, leaving overhang for easy lifting. Lightly grease the sides.
- Mix Dry Ingredients: In a large bowl, whisk flour, sugar, baking powder, and salt until well combined. This helps avoid clumps later.
- Mix Wet Ingredients: In another bowl, whisk melted butter, eggs, buttermilk, oil, and vanilla until smooth.
The oil keeps the cake tender.
- Combine Batter: Pour the wet mix into the dry ingredients. Whisk until just combined. Do not overmix—stop when you no longer see streaks of flour.
- Bake the Sheet: Spread the batter evenly in the pan.
Bake for 14–18 minutes, until the top springs back and a toothpick comes out clean. Cool completely on a rack.
- Make the Buttercream: Place egg whites and sugar in a heatproof bowl over a pot of simmering water. Whisk constantly until the sugar dissolves and the mixture reaches 160°F (71°C) or feels hot and silky with no grit.
- Whip to Meringue: Transfer to a mixer.
Whip on high until glossy stiff peaks form and the bowl feels cool. This may take 7–10 minutes.
- Add Butter: With the mixer on medium, add room-temperature butter, a tablespoon at a time. The mixture may look curdled—keep mixing.
Add vanilla and a pinch of salt, then whip until smooth and fluffy.
- Cut the Cake Rounds: Lift the cooled cake from the pan. Use a 4-inch cutter to punch out 3 rounds. If you don’t have a cutter, trace a 4-inch bowl and cut with a sharp knife.
Save scraps for trifles or snacking.
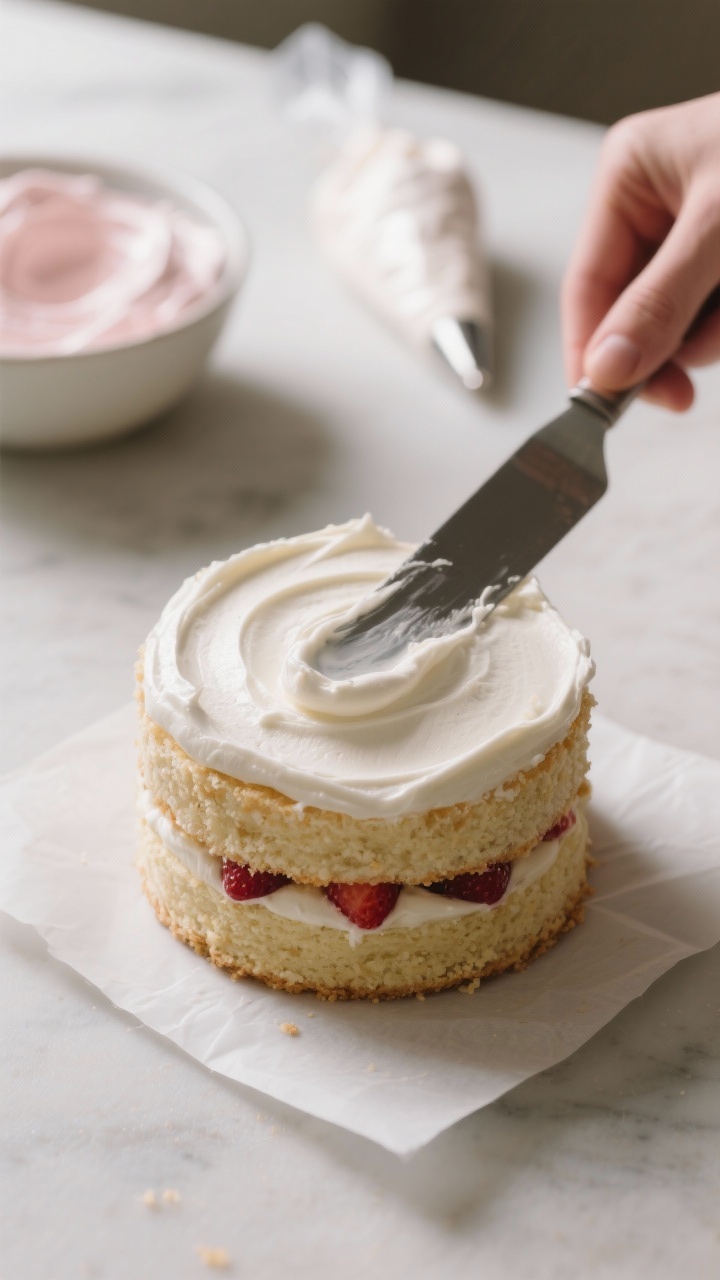
- Crumb Coat: Place the first cake round on a small cake board or square of parchment. Add a thin layer of buttercream or jam. Stack the second and third rounds, repeating the filling if you like.
Spread a thin layer of buttercream all over to seal in crumbs. Chill for 15–20 minutes.
- Final Coat: Apply a thicker layer of buttercream. Smooth the sides with a bench scraper or offset spatula while turning the cake.
Chill briefly to set. For a clean edge, dip the spatula in warm water, dry it, and smooth again.
- Decorate: Tint some buttercream with gel colors. Pipe simple flowers, hearts, or a short message.
Keep it minimal—the beauty of bento cakes is the neat, cute look.
- Box It Up: Place a small parchment square in your bento box. Lift the cake onto it with a spatula. Add a tiny spoon or fork if gifting.
How to Store
Short term: Keep the cake in the refrigerator, covered, for up to 3 days.
Let it sit at room temperature for 20–30 minutes before serving so the buttercream softens.
Freezing: You can freeze unfrosted cake rounds, well wrapped, for up to 2 months. Thaw in the fridge overnight, then frost. Frosted cakes can be frozen, but decorations may lose sharpness—wrap carefully and thaw in the fridge.
Transport tips: Chill the cake until firm, then box it.
Add a small non-slip mat under the parchment to prevent sliding.
Benefits of This Recipe
- Perfect portion size: Great for 1–3 people or small celebrations.
- Beginner-friendly decorating: Small surface area means faster, easier finishing.
- Flexible flavors: The base sponge and buttercream pair with almost any filling.
- Minimal equipment: No need for special pans—use a sheet pan and a cutter.
- Pretty and portable: The bento box presentation is cute, tidy, and giftable.
Common Mistakes to Avoid
- Overmixing the batter: This creates a dense cake. Mix just until combined.
- Frosting a warm cake: Warm layers melt buttercream and cause sliding. Cool completely and chill after crumb coating.
- Rushing the meringue: If the sugar isn’t fully dissolved, the buttercream will feel gritty.
Heat to 160°F or rub between fingers to check.
- Cold butter in buttercream: It won’t incorporate smoothly. Let butter reach room temperature.
- Too much filling: Thick jam layers can make the cake slip. Use a thin layer and pipe a buttercream dam if needed.
Variations You Can Try
- Chocolate Bento Cake: Swap 1/4 cup of flour for cocoa powder and add 2 tablespoons more sugar to the cake batter.
- Lemon Berry: Add lemon zest to the batter and fill with lemon curd and fresh raspberries.
- Matcha: Whisk 1–2 teaspoons of matcha into the dry ingredients and pair with white chocolate buttercream.
- Cookies and Cream: Fold crushed chocolate sandwich cookies into the buttercream and use a milk-soaked sponge for extra flavor.
- Strawberry Milk: Tint the buttercream pale pink and add a drop of strawberry extract; fill with strawberry jam.
What Size Is a Bento Cake?
Most bento cakes measure about 4 inches wide and 2.5–3 inches tall.
They’re usually two or three layers, which gives a nice slice without being heavy.
Can I Make This Without a Stand Mixer?
Yes. You can use a hand mixer for both the cake and buttercream. It may take a few extra minutes to whip the meringue and emulsify the buttercream, but it works well.
Is Swiss Meringue Buttercream Safe?
When heated to 160°F (71°C), the egg whites reach a safe temperature.
If you prefer, use pasteurized carton egg whites and warm them just until the sugar dissolves.
How Do I Get Sharp Edges on a Small Cake?
Chill the cake between coats, use a warm, clean spatula, and work with slightly chilled buttercream. Small, steady motions are better than big sweeps on a tiny cake.
Can I Use American Buttercream Instead?
Absolutely. Beat 1 cup softened butter with 3 cups powdered sugar, 1–2 tablespoons milk, a pinch of salt, and vanilla until fluffy.
It’s sweeter but very stable and easy to color.
How Far in Advance Can I Make It?
Bake the cake rounds up to two days ahead and store airtight in the fridge. Frost the day you plan to serve for the freshest texture and cleanest finish.
Final Thoughts
Bento cakes are small in size but big on charm. With a simple sponge, a smooth buttercream, and a few decorating touches, you can make a cake that looks polished without hours of work.
Whether it’s a mini birthday, a thoughtful gift, or a treat for yourself, this recipe gives you a reliable base to customize and enjoy. Keep it cute, keep it simple, and have fun with the details—you’ll be surprised how easy it is to create something special.