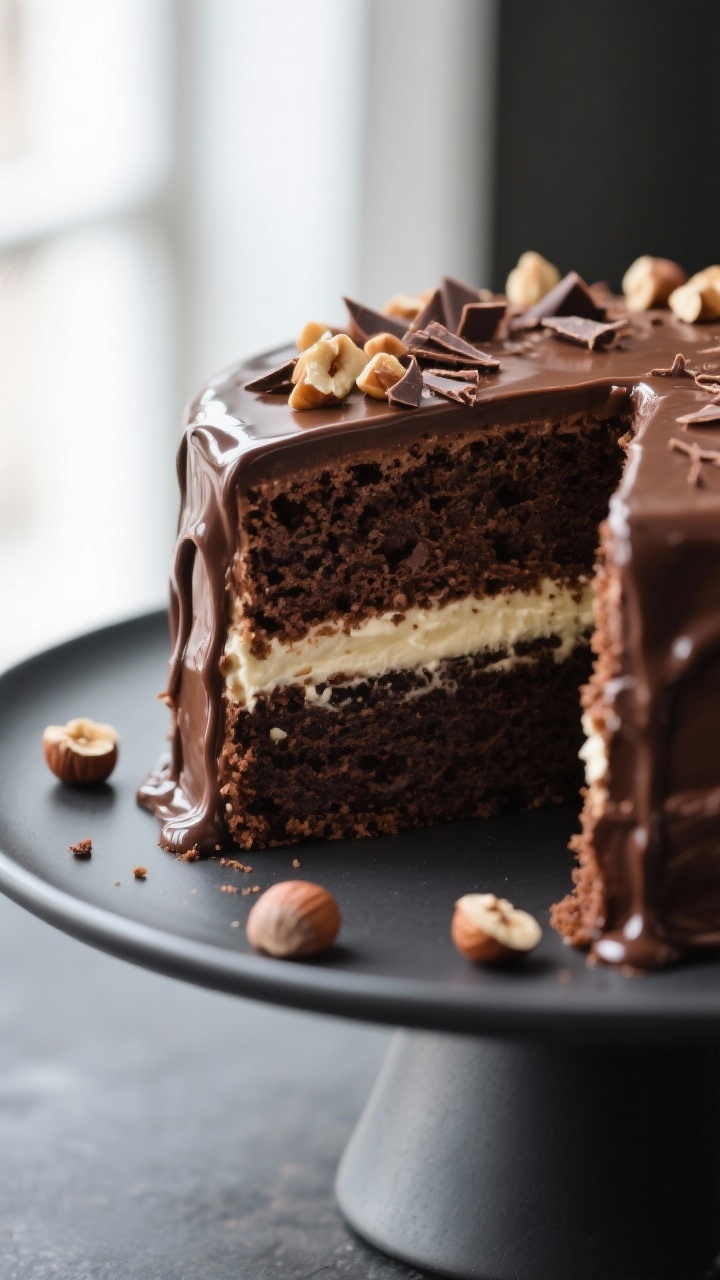
This Nutella layer cake is all about soft chocolate sponge, silky Nutella buttercream, and a glossy finish that looks bakery-level without the stress. It’s the kind of cake that makes people go quiet for a second after the first bite. The flavors are deeply chocolatey with that unmistakable hazelnut note.
The texture is tender, moist, and not too sweet. Make it for birthdays, celebrations, or a cozy weekend—it never feels fussy but always feels special.
Why This Recipe Works
This cake balances flavor and texture in a way that’s reliable and repeatable. Real cocoa in the batter creates a rich base, while oil and buttermilk keep the crumb moist for days.
The Nutella buttercream uses a blend of butter and cream cheese for stability and a clean, creamy finish. A bit of espresso powder boosts the chocolate flavor without tasting like coffee. Chill time between layers helps the cake set neatly, so you get sharp slices and a professional look.
What You’ll Need
- For the cake layers:
- 1 3/4 cups (220 g) all-purpose flour
- 3/4 cup (65 g) unsweetened cocoa powder
- 1 1/2 cups (300 g) granulated sugar
- 1/2 cup (110 g) light brown sugar
- 2 teaspoons baking powder
- 1 teaspoon baking soda
- 1 teaspoon fine salt
- 2 large eggs, room temperature
- 1 cup (240 ml) buttermilk, room temperature
- 1/2 cup (120 ml) neutral oil (canola or vegetable)
- 2 teaspoons vanilla extract
- 3/4 cup (180 ml) hot water or hot coffee
- 1 teaspoon instant espresso powder (optional but recommended)
- For the Nutella buttercream:
- 1 cup (225 g) unsalted butter, room temperature
- 4 ounces (115 g) cream cheese, room temperature
- 2 cups (600 g) Nutella or chocolate hazelnut spread
- 3–4 cups (360–480 g) powdered sugar, sifted
- 1/4 cup (60 ml) heavy cream or milk, plus more as needed
- 1 teaspoon vanilla extract
- Pinch of salt
- For optional finishing:
- 1/2 cup (120 ml) heavy cream + 4 ounces (115 g) dark chocolate for a simple ganache
- Toasted hazelnuts, chopped
- Chocolate shavings
- Equipment:
- Two 8-inch (20 cm) round cake pans
- Stand mixer or hand mixer
- Offset spatula and bench scraper (optional but helpful)
- Parchment paper
How to Make It

- Prep the pans. Grease two 8-inch pans, line the bottoms with parchment, and lightly flour the sides.
Preheat the oven to 350°F (175°C).
- Mix dry ingredients. In a large bowl, whisk flour, cocoa, granulated sugar, brown sugar, baking powder, baking soda, and salt until evenly combined.
- Mix wet ingredients. In a separate bowl, whisk eggs, buttermilk, oil, and vanilla until smooth. Stir espresso powder into the hot water or coffee.
- Combine and thin. Pour the wet mixture into the dry. Stir until you no longer see streaks of flour.
Slowly stream in the hot water/coffee while whisking. The batter will be thin—this is correct.
- Bake. Divide batter evenly between pans. Bake 28–33 minutes, or until a toothpick comes out with a few moist crumbs.
Do not overbake.
- Cool completely. Let cakes cool in the pans for 10 minutes, then turn out onto a rack and cool fully. Wrap and chill for at least 30 minutes for easier frosting.
- Make the buttercream. Beat butter and cream cheese on medium-high until fluffy, 2–3 minutes. Add Nutella and beat until smooth.
Mix in vanilla and a pinch of salt.
- Add sugar and cream. Beat in powdered sugar 1 cup at a time, alternating with splashes of cream, until you reach a thick, silky consistency. It should hold soft peaks but spread easily.
- Level and layer. If the cakes domed, trim the tops. Place the first layer on a board.
Add a generous scoop of buttercream and spread evenly. Add the second layer, cut side down.
- Crumb coat. Spread a thin layer of frosting over the entire cake to trap crumbs. Chill 15–20 minutes.
- Final coat. Apply a thicker, smooth layer of buttercream.
Use an offset spatula and a bench scraper for clean sides. Chill again if adding ganache.
- Optional ganache. Heat cream to steaming, pour over chopped chocolate, and let sit 2 minutes. Stir until glossy.
Cool until slightly thickened, then pour over the chilled cake, letting it drip down the sides.
- Finish and serve. Top with toasted hazelnuts or chocolate shavings. Let the cake sit at room temperature 20–30 minutes before slicing for the best texture.
How to Store
Short term: Keep the cake covered at cool room temperature for up to 24 hours. If your kitchen is warm, refrigerate it.
Longer storage: Refrigerate, covered, for 4–5 days.
Let slices sit out 20–30 minutes before serving to soften the buttercream.
Freezing: Wrap unfrosted layers tightly and freeze up to 2 months. Thaw in the fridge overnight. You can also freeze leftover frosted slices, double-wrapped, for up to a month.
Why This is Good for You
This is a treat, and that’s okay.
It’s good for sharing, celebrating, and creating moments around the table. You’re in control of the ingredients, which means no mystery additives and the option to adjust sugar and salt to your taste. A small slice delivers big flavor, so a little goes a long way.
Balance it with fresh fruit on the side if you’d like a lighter touch.
What Not to Do
- Don’t skip the parchment. Cocoa-rich cakes can stick. Lining the pans ensures easy release.
- Don’t overmix the batter. Mix just until combined. Overmixing can make the cake tough.
- Don’t overbake. Dry chocolate cake is unforgiving.
Pull it when a few moist crumbs still cling to the tester.
- Don’t frost warm cakes. Warm layers will melt the buttercream and slide.
- Don’t thin the frosting too much. Add cream gradually. You want frosting that spreads smoothly and holds shape.
- Don’t skip chilling between coats. The crumb coat sets the foundation for clean, smooth sides.
Variations You Can Try
- Ferrero crunch: Sprinkle chopped toasted hazelnuts and crushed wafer cookies between layers for crunch.
- Salted Nutella: Add flaky sea salt between layers and on top for a sweet-salty contrast.
- Raspberry twist: Add a thin layer of raspberry jam under the frosting for tangy brightness.
- Mocha vibe: Increase espresso powder to 2 teaspoons and use hot coffee for the liquid.
- Three-layer celebration: Bake in three 6-inch pans for a taller cake with more frosting layers.
- Gluten-free: Use a 1:1 gluten-free baking flour blend. Check labels on cocoa and Nutella for cross-contamination.
FAQ
Can I use milk instead of buttermilk?
Yes.
Make a quick substitute by mixing 1 tablespoon lemon juice or white vinegar with enough milk to reach 1 cup. Let it sit 5 minutes before using. The acidity helps tenderize the crumb and react with the leaveners.
Do I have to use espresso powder?
No, but it enhances chocolate flavor.
You won’t taste coffee at this level. If you prefer to skip it, use hot water instead of coffee and omit the powder.
Can I make the cake ahead?
Absolutely. Bake the layers a day or two ahead, wrap well, and refrigerate.
You can also frost the cake the day before serving and keep it chilled. Bring to room temperature before slicing.
What if I only have 9-inch pans?
Use two 9-inch pans and start checking for doneness around 24 minutes. The layers will be slightly thinner, so keep an eye on them.
How do I get super smooth frosting?
Work with cool, not cold, cake layers and room-temperature frosting.
Apply a crumb coat, chill, then apply the final coat. Warm your offset spatula under hot water, wipe it dry, and smooth the sides in gentle passes.
Is there a way to make it less sweet?
Reduce powdered sugar in the frosting by 1/2–1 cup and add a pinch more salt. You can also use a darker chocolate for the ganache and top with toasted nuts to balance sweetness.
Can I make cupcakes with this batter?
Yes.
Line a muffin tin and fill cups two-thirds full. Bake at 350°F (175°C) for 16–20 minutes. Frost with the Nutella buttercream as usual.
What’s the best knife for clean slices?
Use a long, sharp serrated knife.
Wipe the blade with a warm, damp cloth between cuts for neat slices and defined layers.
In Conclusion
This Nutella layer cake brings together everything we love about chocolate and hazelnut in a format that’s simple to bake and impressive to serve. The batter is straightforward, the frosting is silky and forgiving, and a quick chill gives you picture-perfect slices. Whether you keep it classic or add a fun twist, this cake is a guaranteed crowd-pleaser.
Save the recipe—you’ll be asked for it often.