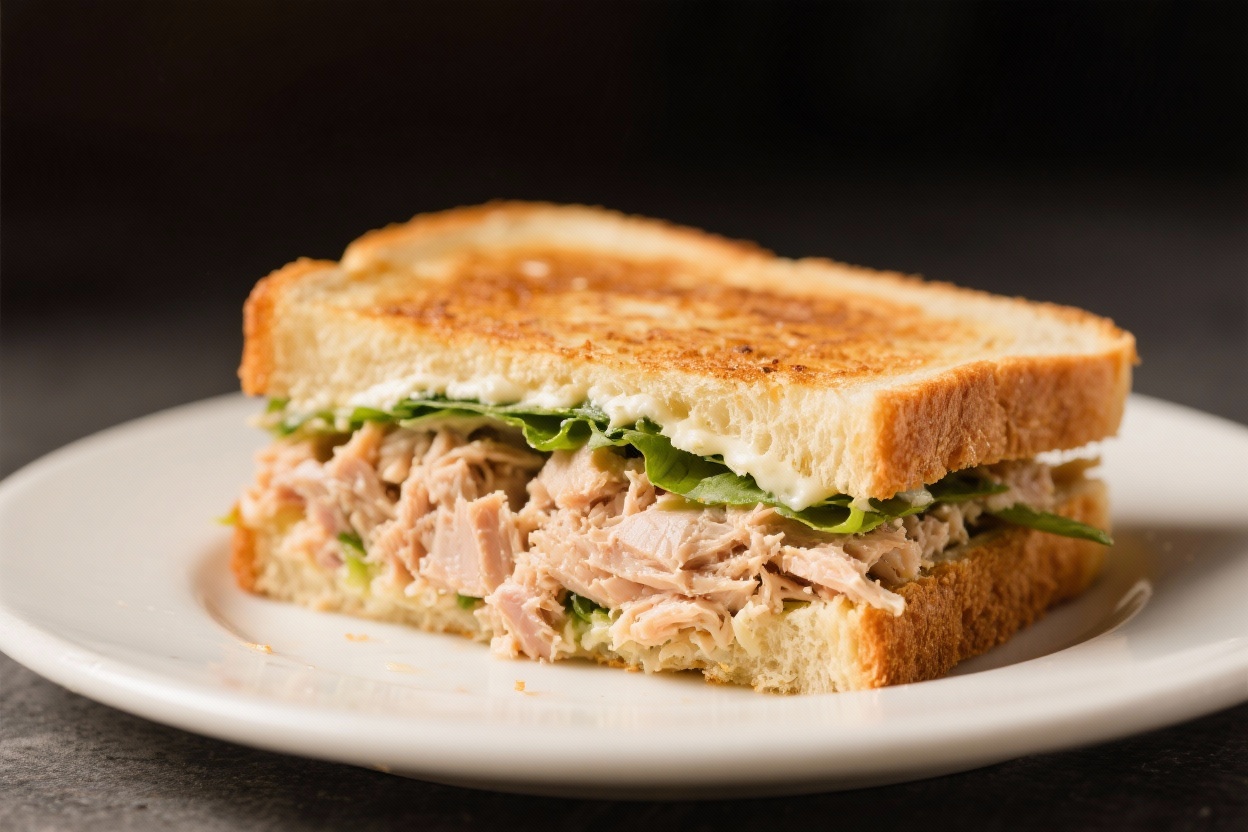
A tuna melt is one of those sandwiches that hits all the right notes: warm, cheesy, crispy, and satisfying. It’s quick enough for a weekday lunch, yet comforting enough to feel like a treat. The classic version is simple, but small tweaks can make it exceptional.
This recipe leans into texture, balance, and just the right amount of richness. If you love a golden crust and gooey center, you’re in the right place.
What Makes This Special
This version focuses on three things: texture, balance, and technique. The tuna salad is creamy without being heavy, thanks to a mix of mayo and a splash of lemon for brightness.
We use two cheeses—sharp cheddar for flavor and a bit of melty mozzarella or Swiss for that stretch. The bread gets crisp and buttery, and the filling stays juicy, not soggy. A quick toast of the bread and a broiler finish give you that perfect crackly top with a tender middle.
Ingredients
- 2 cans (5 oz each) solid or chunk tuna in water, drained well
- 3 tablespoons mayonnaise (more to taste)
- 1 teaspoon Dijon mustard
- 1 tablespoon lemon juice
- 1 small celery stalk, finely diced
- 2 tablespoons red onion, finely minced
- 1 tablespoon dill pickle relish (or finely chopped pickles)
- 1 teaspoon capers, chopped (optional, but great)
- Salt and black pepper to taste
- 1/4 teaspoon garlic powder (optional)
- 4 slices hearty sandwich bread (sourdough or rye works well)
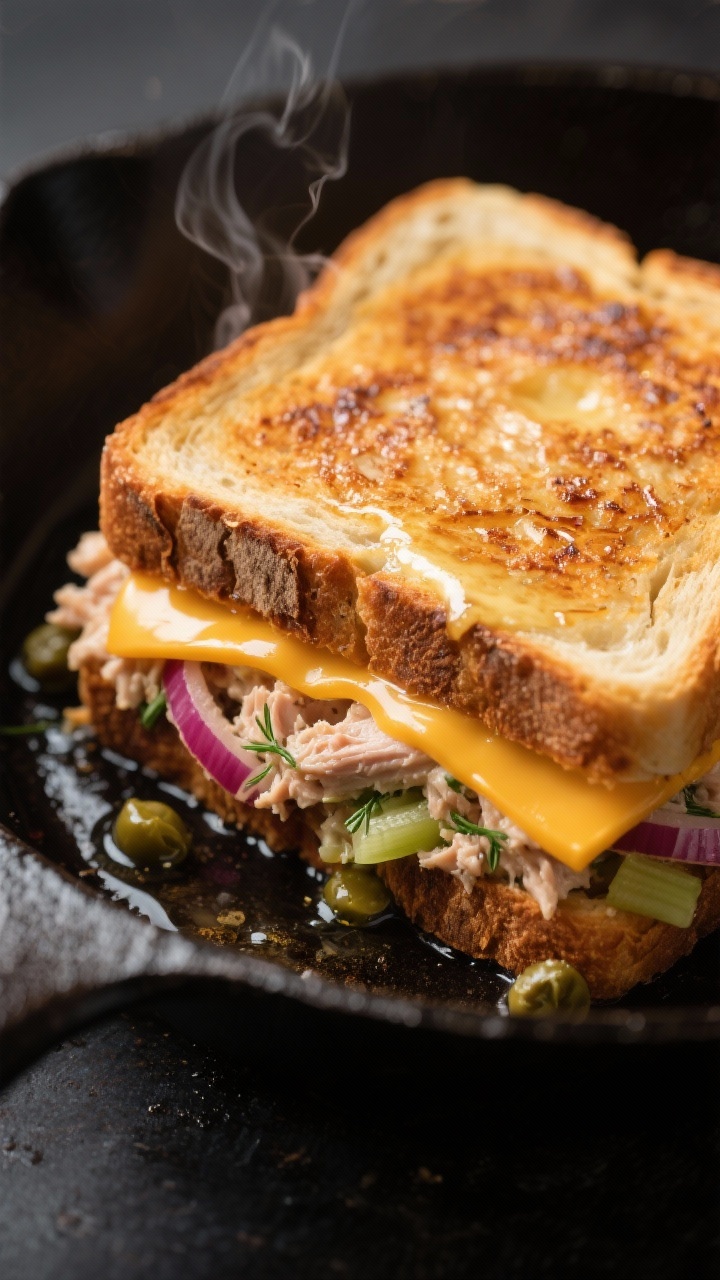
- 4 slices sharp cheddar cheese
- 2 slices Swiss or mozzarella cheese
- 2 tablespoons softened butter (for the bread)
- 1 tablespoon olive oil (for the skillet)
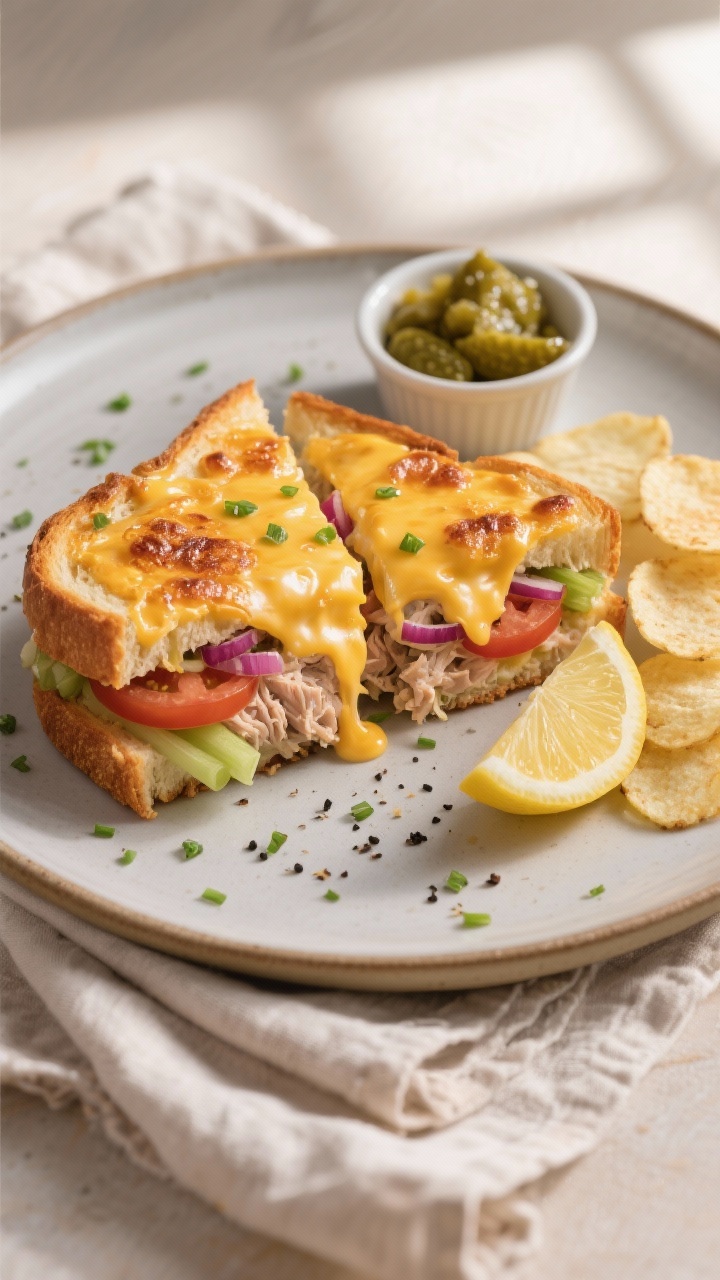
- Tomato slices (optional)
- Fresh parsley or chives, chopped (optional, for garnish)
Instructions
- Prep the tuna salad: In a mixing bowl, combine tuna, mayonnaise, Dijon, lemon juice, celery, red onion, relish, and capers. Add garlic powder if using. Season with salt and pepper. Stir until just combined. You want it creamy but not soupy.
- Pre-toast the bread: Heat a large skillet over medium heat. Lightly butter one side of each bread slice. Place the bread butter-side down and toast until golden. This prevents sogginess and adds crunch. Remove and set aside.
- Build the base: With the toasted sides facing out, place cheddar on two slices of bread. Spoon a generous layer of tuna salad over the cheese. Top with tomato slices if using, then add Swiss or mozzarella. Finish with the remaining bread slices, buttered sides facing out.
- Grill low and slow: Add olive oil to the skillet and reduce heat to medium-low. Place the sandwiches in the skillet. Cook for 3–4 minutes per side, pressing gently with a spatula. The goal is a deep golden crust and fully melted cheese without burning the bread.
- Optional broiler finish: For a bubbly top, transfer sandwiches to a baking sheet, top with a little extra cheddar, and broil on high for 1–2 minutes. Watch closely to avoid burning.
- Rest and slice: Let the sandwiches rest for 1 minute. Slice diagonally. Garnish with parsley or chives if you like. Serve hot.
Storage Instructions
Tuna salad can be made ahead and stored in an airtight container in the refrigerator for up to 3 days.
Keep the bread and cheese separate until you’re ready to assemble. If you have leftover assembled sandwiches, wrap them and refrigerate for up to 24 hours. Reheat in a skillet over medium-low heat to restore crispness—avoid the microwave, which makes the bread soggy.
If freezing, freeze just the tuna salad (not the sandwich) for up to 1 month, then thaw overnight in the fridge and stir in a bit of fresh mayo and lemon to refresh.
Benefits of This Recipe
- Fast and flexible: Quick to make with pantry staples, and easy to tweak to your taste.
- Balanced flavors: The lemon, Dijon, and pickles keep it bright, so it never feels heavy.
- Great texture: Pre-toasting and gentle grilling create a crisp exterior and creamy center.
- Protein-rich: Tuna provides a solid protein boost for a satisfying meal.
- Works for any time: Perfect for lunch, a casual dinner, or a late-night snack.
What Not to Do
- Don’t skip draining the tuna: Excess water makes the salad watery and the sandwich soggy.
- Don’t overdo the mayo: You want creamy, not greasy. Add just enough to bind.
- Don’t rush the heat: High heat burns the bread before the cheese melts. Medium-low is your friend.
- Don’t use flimsy bread: Lightweight bread collapses. Choose sturdy slices like sourdough, rye, or a country loaf.
- Don’t pile too high: Overstuffing makes flipping messy and melting uneven.
Alternatives
- Bread swaps: Try rye, multigrain, English muffins, or a split ciabatta roll.
- Cheese options: Pepper Jack for heat, Gruyère for nuttiness, American for maximum melt.
- Greek yogurt blend: Replace half the mayo with Greek yogurt for a lighter, tangier filling.
- Herb boost: Add dill, chives, or parsley to brighten the mix.
- Spice it up: Stir in a pinch of cayenne, hot sauce, or chopped pickled jalapeños.
- Veggie lift: Add thin-sliced tomato, arugula, or a few pickled red onions.
- Open-faced melt: Toast bread, top with tuna salad and cheese, then broil until bubbly.
- Gluten-free version: Use sturdy gluten-free bread and verify condiments are gluten-free.
- Tuna alternatives: Canned salmon or shredded rotisserie chicken work great with the same method.
FAQ
What kind of tuna is best?
Solid or chunk tuna in water gives you clean flavor and a good texture for mixing. Albacore is mild and meaty; skipjack has a stronger taste. Either works—choose based on your preference.
Can I make it in the oven instead of a skillet?
Yes.
Assemble the sandwich, place on a sheet pan, and bake at 400°F (200°C) for 8–10 minutes, flipping once. For extra melt, finish under the broiler for 1–2 minutes.
How do I keep the sandwich from getting soggy?
Drain the tuna well, pre-toast the bread, and don’t overload the filling. Tomato slices should be patted dry before adding.
Cooking over medium-low heat also helps the bread crisp without trapping steam.
What cheese melts best for a tuna melt?
Cheddar brings flavor, while Swiss or mozzarella add that perfect stretch. A mix gives you the best of both worlds. If you want ultimate melt, add a thin slice of American.
Can I make the tuna salad ahead?
Absolutely.
Mix it up to 3 days ahead and store it covered in the fridge. If it tightens up, loosen with a teaspoon of mayo and a squeeze of lemon before assembling.
Is there a dairy-free option?
Yes. Use a dairy-free mayo and your favorite plant-based cheese that melts well.
Vegan butter or olive oil will crisp the bread nicely.
What if I don’t have Dijon?
Use yellow mustard for a simpler flavor or a bit of whole-grain mustard for texture. You can also skip it and add a touch more lemon.
How do I scale this for a crowd?
Prepare a big batch of tuna salad and pre-toast all bread slices on a griddle. Assemble on sheet pans, add cheese, and bake, then broil to finish.
Slice into halves for easy serving.
Wrapping Up
The perfect tuna melt is all about smart details: well-drained tuna, balanced seasoning, sturdy bread, and gentle heat. With a crisp exterior and a creamy, melty center, it’s comfort food done right. Keep the core technique and swap in flavors to suit your mood.
Once you nail this method, you’ll have a go-to sandwich that never disappoints.